Thursday 29 May 2014

Waste house exhibition

This is my bike having just been set up in the waste house exhibition space. The wall mount for the bike is a piece of the sea defences (which is what the bike frame is made of) that i have sprayed black so your eye is drawn to the wooden frame of the bike. 


This is the trailer and basket also in the exhibition space.


Wednesday 28 May 2014

Sustrans Logo

This is the process of spray painting the Sustrans logo and motto onto the frame. Here i have made two stencils, i will then coat the rest of the frame to prevent getting paint on it and spray over the stencil.


This is the result of the spray painting, I will now give it a couple of coats of varnish over the layers of bio resin to finish it off.


Sunday 25 May 2014

Waste House

This is the space i will be exhibiting my work in. I am displaying my project in the Waste House, a project in the grounds of Brighton Uni Grand Parade that has made a building from entirely waste material. This mirrors my project well with the themes of re using and recycling material.


Here is a link to the Brighton Uni website with information about the waste house. http://arts.brighton.ac.uk/ease/the-house-that-kevin-built 

Bio Epoxy Resin Coating the Frame

This is the frame having been rounded and all the aluminium inserts added. This is the first coat of bio resin to waterproof the frame as well as strengthening it. 


Drying after the second coat of bio resin.


This is showing the laser cut join on the head tube after t has been rounded, sanded and had two coats of resin. After this coat of resin i will paint on the Sustrans logo and give a final coat of varnish.  


Trailer Basket

This is the final basket for the trailer. the bark has been screwed to the frame, making it a sturdy basket. After this i will create handles from the same bark so that the basket is easy to carry.


These are the fasteners i am using to attach the basket to the trailer frame. They should be solid enough to make a strong join between the two whilst also making them quick and easy to detach.


Laser Cut Joins

This is the join for the seat tube. At this stage the hole for the seat tube still needs to be drilled and then must be rounded off. I like the contrast between the greenheart and the ash in this laser cut join.


This is the head tube after the hole has been drilled. After this an aluminium tube will be inserted into this hole to accommodate the front forks and the join will then be rounded off.


This is the hole for the crank shaft, on the left of the image you can see the crank shaft i have cut from the frame of a bike and which will then be inserted into this hole in the frame.


Sunday 11 May 2014

Reviewed Statement

The main piece in this project is a bicycle frame made to fundraise for, and promote the cycling charity Sustrans. I chose to recycle wood from the Brighton sea defenses to create the bike frame because Brighton’s most popular Sustrans route runs along the seafront, parallel to the sea defenses. The design incorporates recycled bike components to create a functioning bike.
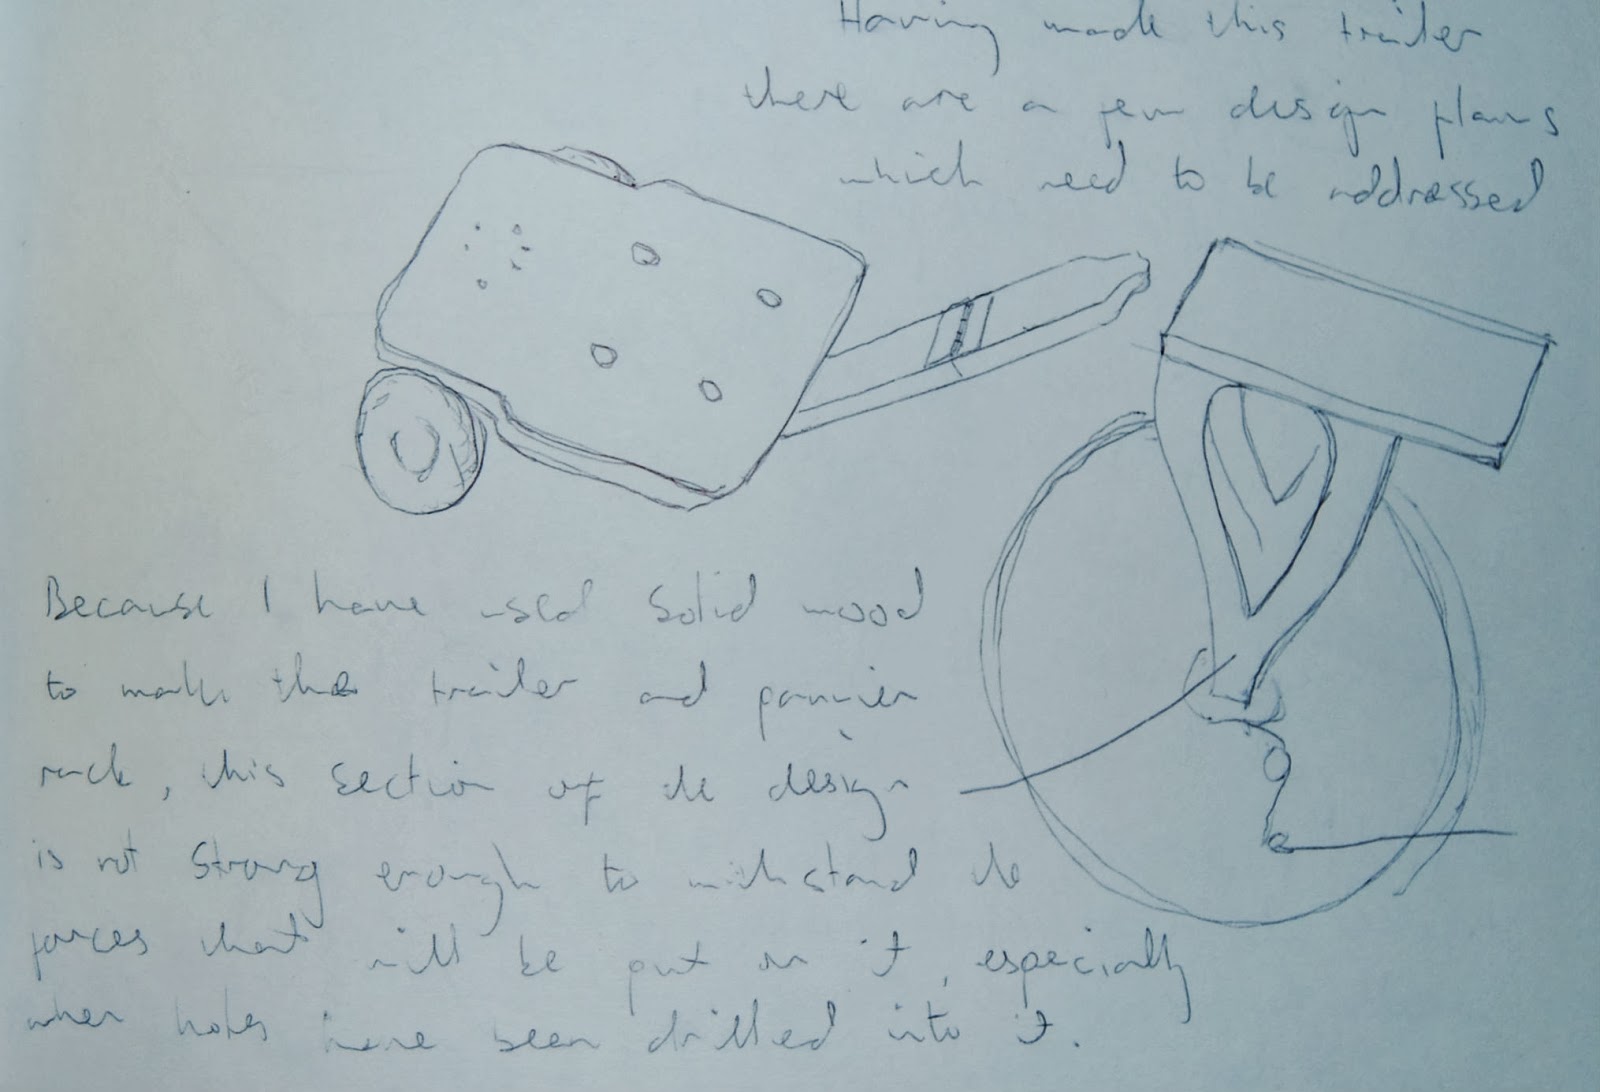
The second piece in the project is a bike trailer made from ash which was sourced from a tree with ash dieback. To make the trailer I have combined the steam bent ash frame, and basket woven from witch elm bark, with the wheels, axle and hitch made by CarryFreedom. The end product is a sturdy and practical trailer with a detachable basket suitable for everyday use.   

Working with reclaimed materials is crucial to the theme of sustainability in the project and also shows the potential for wooden bikes to be produced more cost effectively. These designs celebrate the unique properties and versatility of wood which are often overlooked in favour of more modern and less sustainable materials such as; aluminium and carbon fibre.


To conclude the project, I will be fundraising for Sustrans by undertaking a cycle ride from… to… using the wooden bike and trailer. 


I have left blank exactly where i will be cycling from but i was thinking of doing an extended London to Brighton ride around the Kent coastline via Dover. It seems appropriate to have Brighton as the destination for the ride, both practically and for the story line of the project.

This is not as ambitious a ride as i was originally planning but i think i also have to be realistic about what the bike (and me) is able to achieve.

Trailer Mark 3

This is my final trailer, the piece on the left is the frame of the trailer and on the right is the basket frame. At this point they have both had several coats of bio resin and are drying from their first coat of varnish. 


This is the beginnings of the basket. I have shaped the bark within the now surplus mark 2 frame so i can work on the final basket frame at the same time so the final basket will look much less chunky. The bark has just been shaped and woven into this position around a mold (shown below) and so when attached to the basket frame it will look much neater.


This is the mold used to shape the bark.


Saturday 10 May 2014

Bike

This is the final bike, the layers have been laser cut and glued together with bio-resin. Following the success of my second sample i have used greenheart wood reclaimed from brighton sea defencesto form the majority of the frame and the back forks are steambent ash.


Once these layers have been glued the frame needs to be shaped by hand so it looks more attractive and also to reduce some of the weight. I have chosen greenheart because it is strong and also because of its Brighton connection, but it is a very heavy wood, so although when it has been fully shaped it will lose a lot of weight, it is going to be a fairly heavy bike.


Functional Mark 2 Trailer

Although I am intending to redo this trailer I decided to finish it to i could test it for practicality as well as learning from this example so i can more competently complete the final trailer.


The trailer works very well, it is light, strong and is quick and easy to attach/ detatch. The easily removable wheels mean it can be efficiently stored. 

My final trailer will have a basket the same shape as the frame which fits neatly inside the frame and can be detached for convenience.


The basket frame will be steambent ash in the same shape as the frame of the trailer, however the basket itself will be made from Witch Elm bark shown above and woven over a mold.


Laser Cut Sample

These are some sample joints i have been working on using various techniques. These first layers have been laser cut from my CAD drawing. The joins are nice and accurate however i was hoping to get all 11 layers of the sample join done, but the greenheart wood was a bit dense for the laser cutter and so it took time re-cutting each piece, this also makes it quite expensive.


Bike Sample Joins


These are some sample joints i have made to test the strength of the laminating technique as well as the shaping of the frame. This first sample is made from scrap wood of varying quality laminated using Bio - resin.


This second sample has been made using the same laminating technique but using greenheart wood reclaimed from the Brighton sea defenses which is incredibly dense ans strong. the back forks have been steambent from green ash reclaimed from a tree with ash dieback.

The middle five layers of the sample have had holes drilled through them to reduce weight. I have taken a photo of the bottom of the sample to clearly show the joining technique.


Friday 28 February 2014

Bike Trailer Mark 2

This is the progress of my second prototype trailer, to make it i am using steambent ash laminated together using a Bio-Epoxy resin, the same way that i will be laminating the bike frame. Although this technique has worked well, the frame will have to be re-made to ensure that there are no gaps between the layers so it is both stronger and more aesthitically pleasing.

This is the main frame of the trailer;


To create this curve i have used 4 layers of 5mm ash laminated together. To keep the trailer waterproof, the whole trailer will have several coats of the bio epoxy resin which will also serve to protect the trailer from knocks and scrapes. The cross bar is there to hold the axle in place securely.
 
This is the arm of the trailer which will be bolted to the side of the frame and attach to the bike axle via the hitch from CarryFreedom.


This curve is in the arm to avoid the back wheel of the bike rubbing against the arm, especially when turning tight corners. Creating this free standing curve (as opposed to the frame where it is attached back to itself anf is therefore self supporting) was difficult because when force is applied to the curve the layers start to come apart. For my second atempt at creating the arm i will but bolts through the curve clamping the layers together and stopping them from coming apart.


CarryFreedom Trailer

To create my mark 2 trailer i have decided to source parts from CarryFreedom who make arguably the best bike trailers around. Although i will create the frame, arm and basket for the trailer, i have sourced the wheels and axle which have a simple quick release mechanism to remove the wheels. I have also sourced their bike hitch which attaches the arm of the trailer to the axle of the bike.


These are the wheels and two halves of the axle i will be using. The axle will be put together by slotting a piece of 2.5mm square tubing inside both halves of the axle and then it will be bolted to the frame of the trailer.


This is the hitch, the red part is made from a strong but flexible plastic to allow for movement between the bike and trailer and the metal part is screwed to the outside of the axle. the trailer can be easily connected and removed using this pin.

These parts have been designed and made after much planning, research and testing and so for me to make these parts, i am not going to be able to achieve this level of quality which is why i have chosen to source them from CarryFreedom

 
This is an image of the CarryFreedom Y-Frame trailer. To visit the CarryFreedom website, click on this link; http://www.carryfreedom.com/Y-Frame.html

CAD Drawings


These are my most recent CAD drawings of the bike. As i am laminating thin layers to make the bike i have made two different layers that when overlapped create a strong join. This is the first layer;


The finger joints help create a much stronger connection to form each layer. This join is so strong because of the large surface area created between the two surfaces. I plan to use a laser cutter to cut out these layers which will ensure that it all fits together accurately.
 
This is the second layer;
 
 
The triangles on the bars will be cut from the middle 5 of the 11 layers that make up the bike. This means that the tubes of the bike will be partially hollowed out to save on the weight of the overall frame without compromising strength.


Monday 10 February 2014

Scale Drawings

These are my scale drawings of the bike frame.


This was my first drawing, and although all the lengths are correct there are some aspects of the design that have been changed for practicality of the making process including removing the rounded corners and widening the bars of the frame for strength.


This is my most recent design, but this is likely to change as the designing/ making process goes on.

Thursday 6 February 2014

Bike trailer mark 1

As well as making a wooden bike, i also plan to make a bike trailer. This is my first attempt at a trailer design.

Here are some of my design drawing for my mark 1 trailer;


Although the idea of a folding trailer and pannier rack could work, it was overly complicated for my project and the amount of moving parts weakened the trailer. 

Here are some photos of the mark 1


For the axle and wheels, i used mountain board trucks, but they proved too small and the springs allowing the trucks to turn made the trailer unstable. The idea of the extendable arm worked well but my choice of material was poor, using solid douglas fir meant that the grain weakened the design especially on the pannier rack above.

Because of all these faults i chose to not to fully finish the trailer to give myself more time to start on a new design and i am currently making the mark 2 trailer now using steam bent ash.


Wednesday 5 February 2014

Cranks

22 Chapel Street 
Brighton, BN2 1RQ

Open Tuesdays 3-7pm
Fridays & Saturdays 11-5pm

01273 693 477
cranksbikes (at) gmail com

Cranks are a DIY bike maintenance workshop in Brighton and is entirely run by volunteers, so the service is free and if you are not confident with bikes one of the volunteers will help you fix it as well as teaching you how.

They also recycle and sell old bikes, but as a non for profit organisation this is just to cover costs of running the workshop.

As well as promoting organisations such as this, it may be possible to team up to gain some expertise in maintenance as well as any other useful information they may be able to offer.

I have put their contact details here to contact or visit Cranks, however to visit their website, click this link;http://www.cranks.org.uk/?Welcome  

Brighton Bike Project


Brighton Bike Project is a community organisation that aims to promote and support cycling in Brighton & Hove.  As qualified cycling instructors we want to get people cycling safely and confidently.
The Brighton Bike Project will be running different projects as well as organizing maintenance and other cycling courses.


This is an ad for She Rides, a social cycling club for women of all ages and abilities trying to build up the confidence of cyclists as well as teaching bike maintenance and road safety.

Although i am primarily trying to promote Sustrans, i also want to promote cycling in general, especially in Brighton and there are many worthy cycling related organisations and businesses that i think should also be mentioned.

To visit the Brighton Bike Project website to see some of the other projects they are doing, click this link; http://brightonbikeproject.wordpress.com/

Sustrans


Sustrans are a leading charity focusing on sustainable transport. They work with communities, policy makers and partner organisations to allow people to choose cheaper, healthier and cleaner journeys.

Their main project is the National Cycle Network, a series of paths spanning 14,000 miles across the UK allowing people to travel in safety and comfort. their aim is that these paths become not only the most sustainable option but also the most convenient and enjoyable one.


I worked as a fundraiser for Sustrans over the summer 2013, and as a keen cyclist i strongly agreed with the work that they do. However taking to people about the charity only a few had heard of the name Sustrans although most were familiar with the NCN (National Cycle Network), and this prompted me to start this project promoting cycling with a specific focus on Sustrans.

To visit the Sustrans website and learn more about the good work they are doing click this link; http://www.sustrans.org.uk/

Below is a map of all the Sustrans routes, purple representing on road routes (small roads or cycle paths on road) and green representing cycle paths.


Ligneus bikes

Ligneus bikes, otherwise known as Nick started a project to make a laminated wooden bike based closely on Renovo design. This project was especially useful to me because of Nicks relative lack of equipment, experience of making etc making it more similar to my project.


I emailed Nick for some information/ advice on the project, here are some of the most useful points;

 I ride mine all the way through the winter. In fact I sold my other bike so that is my only bike at the moment..... until I build the next one!

I genuinely have little woodworking experience but am an engineer by profession so its kind of my job to understand joints and stresses!

I worked out that I spent around 100-120 hours on it....excluding procrastination time! 

I'd recommend making a very basic jig to make sure you get the drop out spacing correct and make sure the stays are straight. 


I will use some different techniques to Nick, but generally the techniques will be the same, the only difference being the high quality wood he has used. Even so, it is reassuring to know that he made a fully functioning bike with little experience. 

Renovo bikes

Full Image
Renovo Tourer
  • The Renovo Signature Smooth Ride, nothing else comes close. 
  • Lightweight, brute strong.
  • Stiffest and most durable frame of any.
  • Made of hickory, an axe-handle-tough wood easily repaired without special equipment anywhere in the world
Renovo are a Oregon based company that hand craft hardwood bike frames, and are probably the best in the world. 


The Renovo frame is monocoque, composed of two halves bonded together side-to-side along the long axis of the bicycle. Each frame half consists of four pieces, precision jointed with the strongest and most reliable of joints, the finger joint, then bonded with oven-cured, high temperature epoxy.


Renovo Hoodoo Triathlon

Kona qualifier Tim Winestorfer of Vancouver, Washington rode our prototype Hoodoo in the World Triathlon Championship in Kona, Hawaii, October 9th, 2010.

This is impressive for a wooden bike, however my aims are much more modest than this. Renovo have years of experience making and testing their wooden bikes using the finest materials, equipment and technology, whereas for me, my bike will be more of a prototype, using recycled wood, limited testing and very little technology.